If you’re looking for a great way to drive more traffic to your blog, landing pages or online store, Pinterest is a cost effective avenue to consider. Its reach is huge…. over 300 million monthly active users worldwide!
Before we get into the ‘Pinterest eCommerce hacks’, let’s look at a few more statistics:
79.5% of Pinterest users are female,
70% of users use Pinterest to find accessories, watches, and jewelry,
52% of Pinterest users spent $500 or more on beauty products for over six months, and
60% of millennials use Pinterest to discover new products (Kleinerperkins, 2018).
Here’s a list of the most popular content on Pinterest:
- Travel
- Health and Wellness
- DIY Home Renovation Projects
- Women's Style
- Beauty
- Food and Drink
- Motivational Quotes
Additionally, providing educational content is particularly helpful on Pinterest. You might consider providing tips and insights along with your content to give viewers added value and new ideas.
Pinterest is also an excellent place for wedding brands and niche stores to really show off what makes them unique from other companies and brands.
Pinterest eCommerce Hacks And Tips For Effective Pinning
#1 Setup A Business Account
If you want to use Pinterest for your eCommerce business, you’re required to set up a business account and agree to Pinterest’s Business Terms of Service.
Here are the added benefits of setting up a business account:
- It’s free!
- Pinterest allows you to display your business name instead of your personal name, which makes you look more professional.
- Pinterest allows you to display “rich pins”, allowing you to show your branding, your blog post title and description, and more (discussed further below).
- Pinterest gives you access to promote your pins (advertising).
- Pinterest provides analytics so you can see how people are interacting with your pins and content.
You can get started with setting up a business account here.
Tip: Let’s say your Pinterest Page is called “Joan’s Garden” and you plan to sell gardening decor as well as provide gardening tips. Be sure to use keywords in your bio name and description that describes those key things so people know who you are at a glance.
Example: Joan’s Garden: Garden decor + tips to help beginner gardening enthusiasts.
#2 Link To Your Website And Verify Your Account
For a business account, it needs to be linked to your website. When you verify this, it allows you to show your website as a clickable link on your bio. This allows you to build trust with your followers and it also helps you to develop more page views.
#3 Post Pins Regularly
It’s important to know that Pinterest wants you to be consistent. When Pinterest’s algorithm sees that you are pinning on a consistent basis, AND that you are linking to high-quality, original content, Pinterest will start increasing your impressions (the total number of times your Pins were shown) so that your content is shown to users more often.
I’d recommend a minimum of 3-5 Pins each day if you’re just starting out – this is far more effective then adding a whole bunch of pins on one day and none on others. Once you’re up and running, most Pinterest gurus recommend you pin 10-25 Pins per day, however it’s also important to note that Pinterest’s Head of Product Marketing, Sarah Hoople Shere, states that it’s your first 5 pins that you save each day that will get the most reach.
This can be overwhelming if you’re just starting out, especially if you don’t have a vast selection of content to link to. A great hack is to create 3 different Pins per article, and have each Pin focus on a different aspect of your article.
In addition, it’s recommended that you rePin (share) other people’s Pins to your boards as well. We’ll discuss this further down in the article, but as a general rule, gurus will say 20-30% of your Pins should be Pin’s from other people’s accounts. When you first start out, this percentage may be higher (50%+), and it is a great way to build traffic and interest to your own Pinterest page while you create your own content.
You also want to spread out when you post your Pins – don’t post them all at one time. But, rather than be tied down to your computer pinning your life away, I highly recommend you schedule your Pins.
There are a number of options available for scheduling your Pins, here are a few popular scheduling tools:
- Pinterest offers its own free scheduling tool, which allows you to schedule up to 30 pins at a time.
- Hootsuite also allows you to post 30 Pins at a time for free, but it allows you to schedule posts across multiple social media platforms, not just Pinterest. So if you’re looking to schedule posts to Facebook, Twitter, and Instagram as well, this could be a good option for you. Hootsuite also has Paid plans if you need to schedule more than 30 posts at a time.
- Tailwind is a very popular scheduling tool used by many Pinterest gurus. Tailwind’s free trial allows you to try all of Tailwind features for free while scheduling up to 100 Pins on Pinterest and 30 posts on Instagram (no time limit for free trial). Paid Tailwind plans start as low as $9.99/ month following your free trial.
#4 Post Pins During Peak Times For Most Exposure
According to Fannit, the best times to Pin are between 8pm and 11pm EST, and between 2am and 4am EST.
Pinterest seems to have the most activity when users are sitting down during their free time in the evenings, so it’s recommended to post during those times, and avoid posting Pins when people are at work.
#5 Best Type Of Content To Pin
- Monday – Fitness / Health
- Tuesday – Gadgets / Technology
- Wednesday – Quotes
- Thursday – Outfits / Fashion
- Friday – Gifts / Humor
- Saturday – Travel
- Sunday – Food / Crafts
Remember, Pinterest’s algorithm is always looking for spam-free, high-quality content that is useful for its users, so be sure that you are providing relevant content that does not violate Pinterest’s guidelines.
Here are some examples of content you can create using the ‘types of content’ listed above: (also, don’t forget to include within your content images of your relevant products, and link to your product landing page)
Monday: Health / Fitness
- 5 Ways To Burn Calories While Gardening
- 3 Vegetables You Can Grow and Eat To Reduce Your Risk Of Heart Disease
Tuesday: Gadgets / Technology
- 3 Gardening Gadgets To Make Weeding Easier and Quicker
- 4 Ways You Can Use Technology For Watering Your Garden
Wednesday: Quotes
- “To plant a garden is to believe in tomorrow. – Audrey Hepburn” (write an article on the emotional benefits of gardening, and link the quote to it)
Thursday: Outfits / Fashion
- 3 Best Gardening Gloves To Use for Pruning Roses
- 3 Gardening Hats To Shade You From the Sun
Friday: Gifts / Humor
- 5 Gift Ideas for Gardening Enthusiasts
- 3 Gift Ideas for New Gardeners
Saturday: Travel
- 3 Gardens to Visit In “Your State”
- 7 Most Beautiful Gardens In the World
Sunday: Food / Crafts
- 3 DIY Christmas Floral Arrangements
- 5 Vegetables You Can Grow Indoors
It’s no secret that it takes quite a bit of effort to create high-quality content, but keep in mind that you are providing added value to your readers and potential customers – and this is what will set you apart from competitors in your niche.
Tips And Hacks For Pins That Get Noticed
Because Pinterest is a ‘visual’ search engine, you need to create Pins that stand out from everyone else's. Yes it’s great if your Pins are getting a lot of impressions, but it’s the ‘saves’ and ‘clicks’ that truly pave the way for successful Pins.
#1 Enable Rich Pins
Rich Pins are a Pin format that provides more context by showing extra information directly on the Pin.
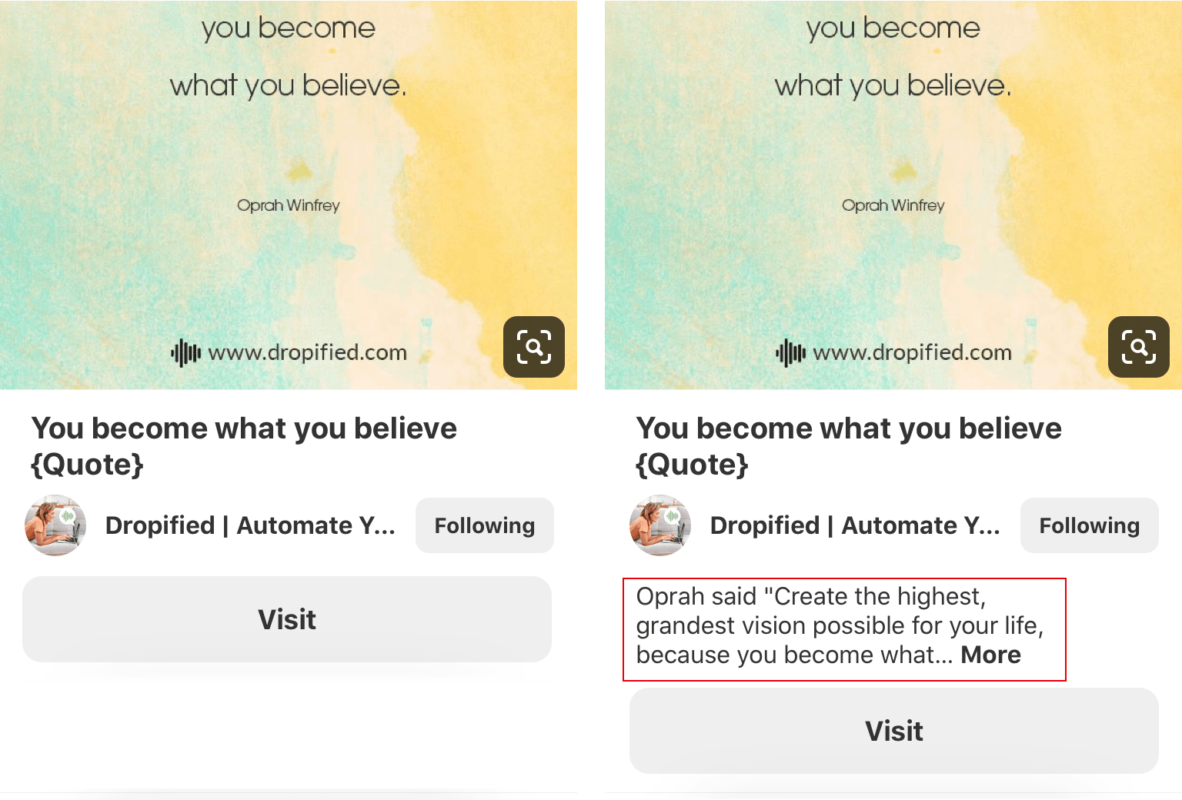
How do you enable Rich Pins? If you have a WordPress site for your blog, you can set up Rich Pins in just a few minutes:
Step 1: Install The Yoast SEO Plugin
Once it’s installed, activate it. Next go to the Social tab in its settings, then to the Facebook tab. Make sure this tab is ON, and then make sure Add Open Graph meta data at the top is set to Enabled.
Step 2: Validate Your Rich Pins
This is a pretty simple process, go to the Rich Pin Validator, enter a URL from your site and then click the Validate button. You can then check the Rich Pin preview to see if it shows as expected.
Step 3: Apply for Rich Pins With Pinterest
If you see the green check and the “Your rich pins are approved and on Pinterest” message, do a happy dance, because you are all set up and ready to go. It will likely take a few days for your current Pins to populate the ‘Rich Pin’ information, so just be patient as Pinterest gathers the information.
(You can read more about Rich Pins here.)
#2 Provide Keyword Rich Board Titles, Pin Titles And Descriptions
Because Pinterest operates as a search engine, it’s important to include descriptive keywords in your Board names, Pin titles and Pin description.
You’ll also want to include a call-to-action in your Pin descriptions so people know what you want them to do once they click on it. This is especially helpful for people who ‘repin’ and follow your link at a later time.
If you’re unsure of what keywords to use, try typing a few keywords into Pinterest's search bar and you’ll see a number of ideas for topics already being searched.
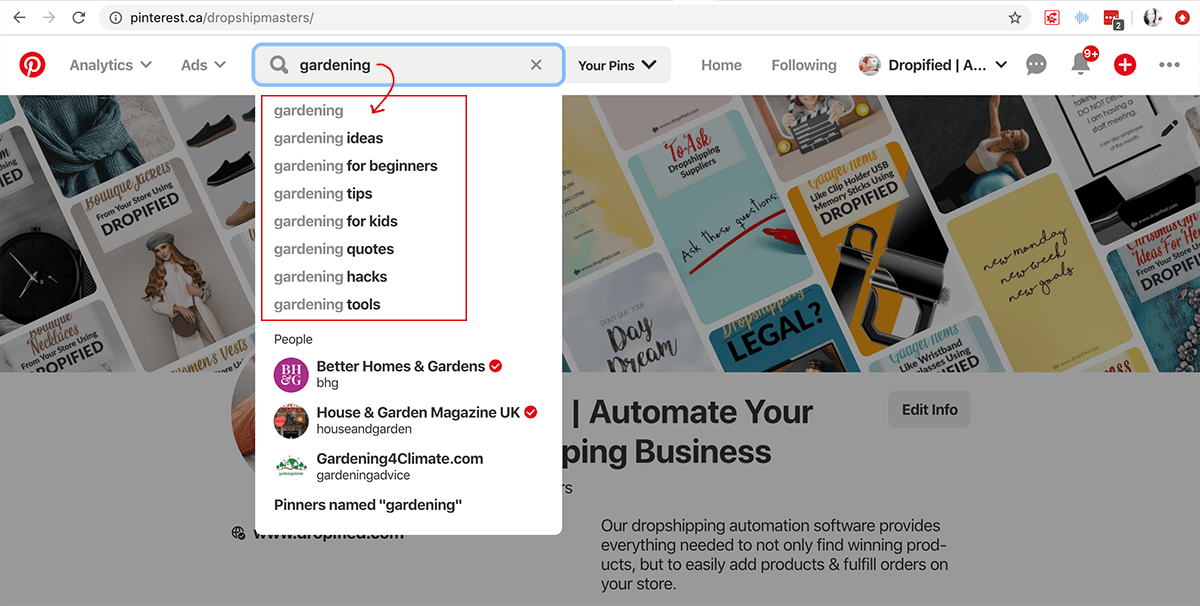

Another helpful tip is to use ‘numbers’ in your Pin and article/blog titles.
For example, if you have an online store that sells gardening accessories, consider writing and linking to an article that talks about gift ideas for mothers. Get specific and have it read something like “5 Gift Ideas For Mothers Who Enjoy Gardening”, or “3 Gift Ideas For Moms Who Love Tulips”.
Pinterest gurus say over and over that Pins that display numbers in the titles get more engagement than Pins that don’t.
#3 Use Proper Sizing For Creating Pins
If you’re creating your own Pins using Photoshop or something similar, you’ll want to use Pinterest’s recommended sizing.
- File type: PNG or JPEG
- Max file size: 32 MB
- Aspect ratio: We recommend using a 2:3 aspect ratio, or 1000 x 1500 pixels. Pins with an aspect ratio that's greater than 2:3 might get cut off in people's feeds
If you don’t have Photoshop, Canva is a very popular and highly recommended option. Canva has templates you can use, and the sizing is Pinterest friendly.
Some additional tips are:
- Keep important text in the top ⅓ of you Pin so that viewers can see right away what your Pin / content is about.
- Use high-quality, attractive imagery.
If you don’t have your own images, you have a number of options:
Popular Free Stock Image Sites:
Or you can explore this link:
Popular Paid Stock Image Sites:
Or you can explore this link:
Tips And Hacks For Gaining Followers
According to Pinterest’s Head of Product Marketing, it’s better to have a low number of highly engaged followers than a large number of followers that rarely engage, so keep this in mind as you look for new followers.
#1 Follow Your Competitor’s Followers
You and your competitors share the same audience, so it stands to rule that there is a good chance those followers will follow you too!
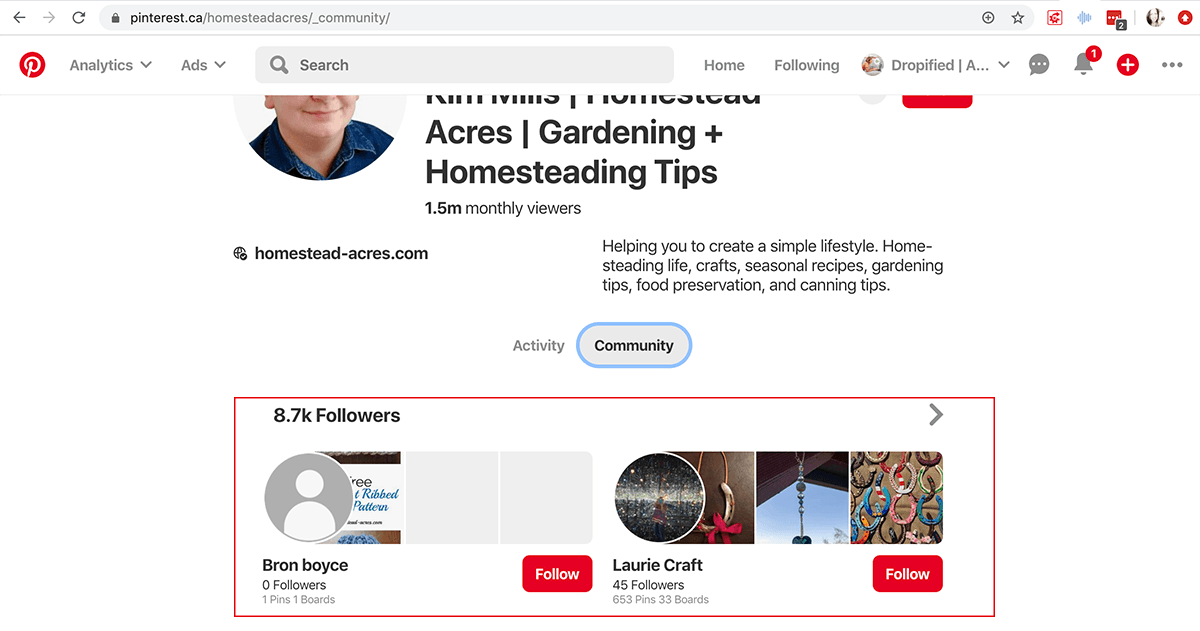
For example, if your content is about gardening, do a Pinterest search for “gardening tips” and you’ll notice there is a ‘people’ category. Click on those suggestions.
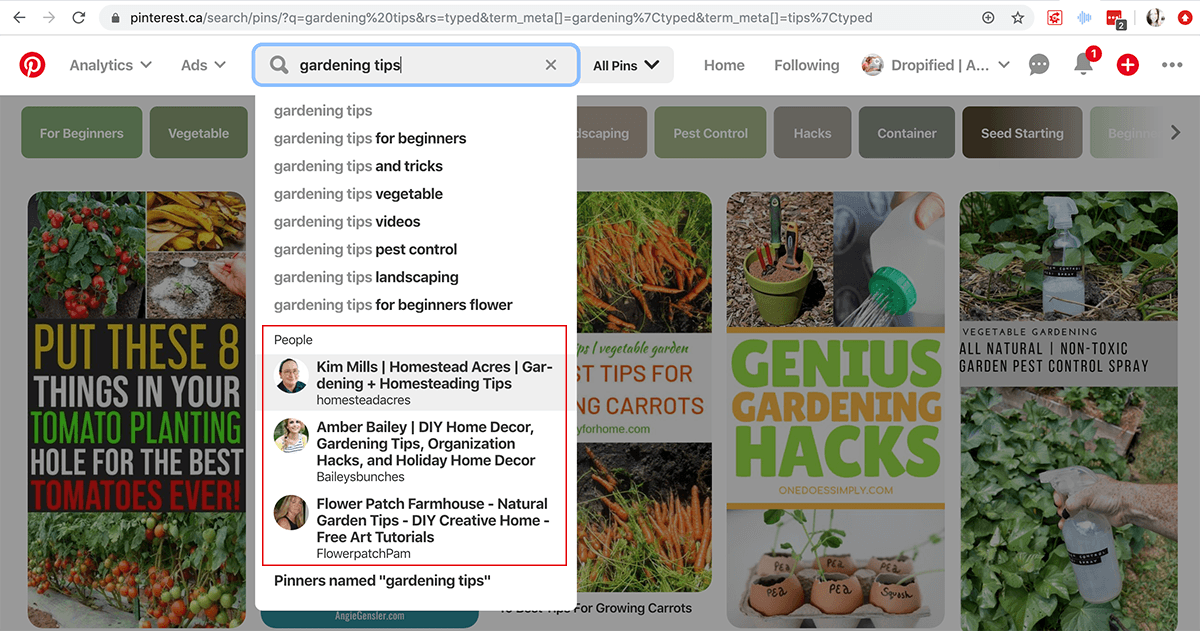
From here, go to your competitor’s followers (currently under the ‘Community’ tab) and look through their followers and follow them. You’ll find that many of them are happy to follow you back.
#2 Share Other People’s Pins
Another way to gain traction and followers is to establish yourself as a source of high-quality, useful information. You can help establish this by sharing relevant Pins from others along with your own Pins.
When you share other Pins that offer useful information that complements your own brand, you can drive traffic and increase your account’s engagement. This, in turn, increases the number of impressions (views) that your own Pins receive.
Many gurus will tell you that people who share only their own Pins never perform as well as those who incorporate Pins from others, and so, it’s recommended that you share relevant content from others.
Here’s how Pinterest’s algorithm works.
The Pinterest algorithm decides what content to show more of based on engagement. If the content you share is receiving lots of saves and clicks from others (engagement), this will boost your own account’s value, and Pinterest will be more likely to show even more of your Pins.
With Pinterest, it’s not JUST about how many followers you have, it’s about the overall value of your account. The goal is to have Pinterest value your account as a good source of high quality, original content. This is what will build engagement, increase impressions, and bring more exposure to your website.
#3 Use Hashtags In Your Pin Descriptions
Hashtags in Pinterest work the same way as they do on Instagram, Twitter, etc. by making it easier for people to find the content they are looking for.
For example, if a Pinterest user started a search using the hashtag #rosepruningtips, they would see all the ‘rose pruning tip’ related Pins.
Let’s say your gardening site is called “Joan’s Garden”. If you use your own branded hashtag #joansgarden along with other relevant and descriptive hashtags in your Pin descriptions, it means that a user could find all your content simply by clicking on your branded hashtag.
Note: It’s recommended that you add hashtags to the end of your Pin descriptions.
#4 Join A Group Board To Get Added Exposure
Group boards are a great way to increase traffic. A group board is owned by one person, but they allow other pinners to contribute to that board as well. You can request to join a group board by contacting the owner, and once accepted, they will send you an invite that allows you to post your own Pins to their board.
The bonus about pinning to group boards is that they already have followers and traffic. So as soon as you post your Pin to that board, you have instant exposure to anyone following that board.
So, how do you find group boards?
Go to PinGroupie and simply enter a keyword into the search bar (ie Gardening). You’ll find results for available group boards along with statistics on that board such as the number of followers, number of collaborators, and requirements/rules for joining the board as a contributor/ collaborator.
#5 Add Follow Buttons
Be sure to have the Pinterest ‘Pin It’ / “Follow” buttons your blog posts and pages. This allows readers to share your content with others by posting your articles to their own Pinterest Boards. This has the potential to create a massive increase in referral traffic back to your site!
To get started with adding buttons, go here.
#6 Boost Your Pins By Promoting Them
Pinterest allows business accounts to promote their pins to attract a new audience. Promoted Pins are just regular Pins that you pay to be placed where people are most likely to see them help to increase audience engagement, conversions and traffic.
To learn more about Promoted Pins, click here.
In Conclusion
As you can see, Pinterest can be a pretty big undertaking, but it also can be one of the most rewarding methods of acquiring new exposure. And, if you’re already producing blog content, this is a cost-effective method of connecting your content and products to even more potential customers.
What are your thoughts and experiences with Pinterest? Do you use Pinterest to promote your website’s blog and products? What successful methods have you used? Do you have any added tips and hacks to share?

